Thursday, May 19, 2011

Thick and Thin Striped Beanie—New Born

Supplies:
Two colors of yarn
Size 5mm (H/8) hook

Abbreviations:
Ch—chain
Dc—double crochet
Sc—single crochet
Sl St—slip stitch
Tr—triple crochet

Instructions:

Hat
Round 1: With color 1, Magic Ring, ch 3. Inside ring, 8 dc. Tighten ring, join to top ch of ch 3.
Round 2: With color 2. Ch 1. 2 sc in each dc around. Join to ch.
Round 3: Change to color 1. Ch 3. *2 dc in next sc. Dc in next 2 sc. Repeat from * around. Join to top ch of ch 3.
Round 4: Change to color 2. Ch 1. Sc around. Join to ch.
Round 5: Change to color 1. Ch 3. *2 dc in next sc. Dc in next 2 sc. Repeat from* around. Join to top ch of ch 3.
Round 6: Change to color 2. Ch 1. Sc around. Join to ch.
Round 7: Change to color 1. Ch 3. Dc around. Join to top ch of ch 3.
Round 8: Change to color 2. Ch 1. Sc around. Join to ch.
Round 9: Change to color 1. Ch 3. Dc around. Join to top ch of ch 3.
Round 10: Change to color 2. Ch 1. Sc around. Join to ch. Finish off. Weave in ends.

Flower
Ch 4 and form a ring with a sl st.
Round 1: Ch 3, 11 tr in ring and finish with a sl st in 3rd ch from beginning of round.
Round 2: *ch 4, 1 tr in the first of the 4 ch just crochet, skip 1 tr, 1 dc in next tr*, repeat from *-* a total of 6 times and finish with a sl st in sl st from end of previous round.
Sew flower onto hat.


Thick and Thin Striped Beanie—Adult

Supplies:
Two colors of yarn
Size 5mm (H/8) hook

Abbreviations:
Ch—chain
Dc—double crochet
Sc—single crochet
Sl St—slip stitch
Tr—triple crochet

Instructions:
Hat
Round 1: With color 1, Magic Ring, ch 3. Inside ring, 16 dc. Tighten ring, join to top ch of ch 3.
Round 2: Color 1. Ch 1. 2 sc in each dc around. Join to ch.
Round 3: Color 1. Ch 3. *2 dc in next sc. Dc in next 2 sc. Repeat from * around. Join to top ch of ch 3.
Round 4: Change to color 2. Ch 1. Sc around. Join to ch.
Round 5: Color 2. Ch 3. *2 dc in next sc. Dc in next 2 sc. Repeat from* around. Join to top ch of ch 3.
Round 6: Color 2. Ch 1. Sc around. Join to ch.
Round 7: Change to color 1. Ch 3. Dc around. Join to top ch of ch 3.
Round 8: Color 1: Ch 1. Sc around. Join to ch.
Round 9: Color 1. Ch 3. Dc around. Join to top ch of ch 3.
Round 10: Color 1: Ch 1. Sc around. Join to ch.
Round 11: Color 1. Ch 3. Dc around. Join to top ch of ch 3.
Round 12: Change to color 2. Ch 1. Sc around. Join to ch.
Round 13: Color 2. Ch 3. Dc around. Join to top ch of ch 3.
Round 14: Color 2. Ch 1. Sc around. Join to ch.
Round 15: Change to color 1. Ch 3. Dc around. Join to top ch of ch 3.
Round 16: Color 1: Ch 1. Sc around. Join to ch.
Round 17: Color 1. Ch 3. Dc around. Join to top ch of ch 3.
Round 18: Color 1: Ch 1. Sc around. Join to ch.
Round 19: Color 1. Ch 3. Dc around. Join to top ch of ch 3.

Flower
Color 2
Ch 4 and form a ring with a sl st.
Round 1: Ch 1, 4 dc in ring and finish with a sl st in ch from beginning of round
Round 2: *ch 4, 1 tr in the first of the 4 ch just crochet, 1 dc in next dc*, repeat from *-* a total of 5 times and finish with a sl st in sl st from end of previous round.


Monday, May 16, 2011

Wooden Garden Decorations

I have found a new love for a hobby. I am in the process of cleaning out my dad's wood shop and transforming it into a work shop for myself and my new found hobby: Garden Decorations. I have so many designs and ideas running through my head. I am a person who decorates for every season/holiday. Below is a list of ideas that I have for garden decorations for each season/holiday.

Spring/Summer: Daisy, Sunflower, Beehive
Fall/Thanksgiving: 2 different Pumpkins, Acorn, Turkey
Winter/Christmas: Snowflake, Snowman, Christmas Tree, Stocking, Christmas Lights, Candy Cane
Valentine's Day: Hearts, Love
Easter: Eggs

Most will sell for $5 a piece. The bigger ones will range from $10 - $15 a piece. Buy a large quantity of one type and receive a discount.

If you could design your own garden decoration what would it be? Share your thoughts and your design might get made.

Saturday, May 14, 2011

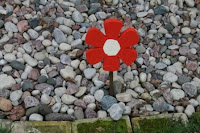
Wooden Flowers


I wanted some bright, wooden flowers to place in my rock gardens. However, I didn't want to pay lots of money for them when they looked so simple. I used some wood I found out in my dad's wood shed and traced my flower pattern on it. Then I used the jig saw to cut out the flowers. They got a sand job and several layers of paint. Each flower has a two foot metal stack attached to the back. I have two different sizes. The pink flower is the biggest and the other three are the same size.


Monday, May 9, 2011

Name Signs

One of my best friends got married over the weekend. This is the name sign that I created for them to hang in their kitchen of their new house.

New Welcome Signs


Welcome signs that I made for mine and his grandma for Mother's Day.


Wednesday, May 4, 2011

Little Basket


Basket

Start with a magic circle.

SC 6 in magic circle, 2 SC in each of the next 6 SC (total of 12 SC)
SC, 2 SC in next SC and repeat this sequence 6x for a total of 18 SC
SC 2, 2 SC in next SC and repeat this sequence 6x for a total of 24 SC
SC 3, 2 SC in next SC and repeat this sequence 5x for a total of 30 SC
SC 4, 2 SC in next SC and repeat this sequence 5x for a total of 36 SC

I stopped here as this was the size that I wanted, but you can carry on to make a larger basket.

Slip stitch into next SC, chain 2, DC in each SC around then slip stitch into first 2 chain. Repeat until your basket is the length you desire. I added 4 DC rows. Once the basket is the length you would like do not fasten off as you now need to make your handle.

To make handle, CH 1, then 3 HDC, CH 1 turn 3 HDC and repeat until your handle is the desired length.

Once your handle is long enough for you, you will need to fasten on to the other side of the basket. Hold the strap against the side and then SC across to fasten. Turn your basketb inside out.


Flower

CH 6. Join with SLST to first CH to form a ring

1st rnd: CH 1, 2 SC in ring. (CH 4, 3 SC in ring) 5 times. CH4. 1 SC in ring. Join with SLST to first SC.
2nd rnd: SLST in next SC and next CH 4 loop. *(1 SC, 1 HDC, 4 DC, 1 HDC, 1 SC) in CH 4 loop. Miss next SC. SLST in next SC. Repeat from * 5 times more. Fasten off.

Sew flower to the basket.

Sunday, May 1, 2011

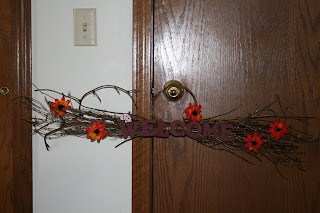
Welcome Signs


I wanted something new and fun my porch this summer. I couldn't find what I had in mind, so instead I decided to make it.

Materials

1 Grape Vine Swag
5-10 2" flowers of your choice (I used sunflowers)
4" letters to spell out WELCOME or you could spell out what ever you wanted to
Acrylic paint of choice to paint the letters
1 decorative piece to add to swag
Hot glue gun

Directions

Paint the letters. You may need to paint 2 to 3 coats on the letters. Let each layer dry for an hour before painting another.

Pluck all flowers off of the stems. Hot glue a couple leaves to a couple flowers.

Hot glue your letters on to the swag. Place flowers through out the swag with hot glue. And finally place your decorative piece on the swag as well.

Finally find a really great place to display it!

Two variations to my original creation.

Birdhouse

Rooster